
Beer Can Chicken!
And now we come to it. One of our customers’ very favorite recipes: Beer Can Chicken.
So. Beer Can Chicken. Classy, very classy. Certainly it’s showing up on the menu of ALL the best places in town!
I’ve got to give credit where credit is due. This is a mix of several recipes and ideas…first and foremost, my friends Tim & Emily were kind enough to share their favorite recipe, adding that they prefer to brine overnight first and then finish in the oven for temp control. I’ve worked in my own favorite brine and then loosely followed the spice blend from The Wooden Skillet (Tim’s recommendation) for the dry rub after brining… and kept my Papa’s ideas floating around for inspiration. I think you’ll be pleased with the result!
You’ll notice that the beer can is to be “half-full.” The reason for this seems to be that it would take too long for a full can to get hot enough inside the bird to create the steam effect we’re looking for. Well, darn. You’ll have to do something with that half-can before sticking it in the chicken.
Oh, brother. I saw someone online saying that beer can chicken is sort of pointless (killjoy!)…that it doesn’t add much to the flavor. I will admit that nobody will be complaining if you just brine and smoke or grill that chicken! But whatever the jury decides in the final analysis, beer can is flat-out a fun way to cook your chicken, and that’s that.
It’s fun to see, fun to do, and delicious to eat.
ENJOY!
Beer Can Chicken
BRINE INGREDIENTS
16 cups water
¾ cup salt
⅔ cup sugar
2 heads garlic
1 t whole black peppercorns, cracked
1 large bay leaf
DRY RUB INGREDIENTS
1 T salt
2 t onion powder
2 t garlic powder
2 t paprika
1/2 t fresh-ground black pepper
1/4 t ground ginger
1/2 t ground cumin
OTHER INGREDIENTS
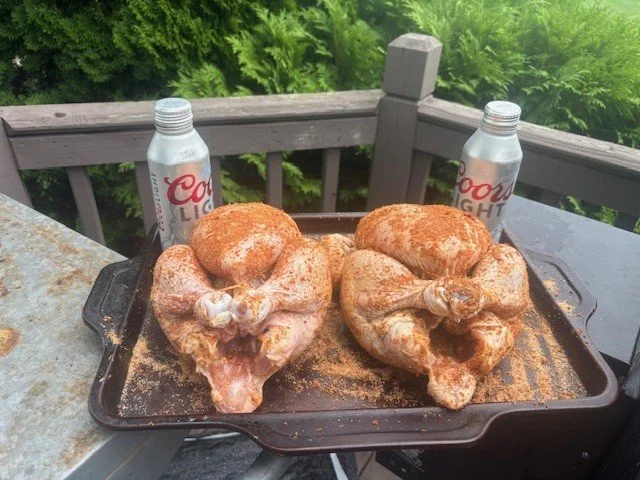
1 16-oz can of beer of your choice, half-full
1/2 stick butter, melted
Combine all brine ingredients in a stock pot and simmer for 20 minutes, making sure salt and sugar dissolve fully. Let cool an hour or two. You do not want to pour warm brine over a cold bird and then let it sit 12-24 hours before cooking.
Rinse chicken, pulling out the giblets. (The “giblets” are the things inside the cavity of the chicken. At The Cluckery, we include the neck, heart and liver. Reserve the neck for your stock pot; saute the heart and liver in a bit of butter for a nutritious snack.) Pour cooled brine over the chicken and refrigerate 12-24 hours; too long, and the chicken may be too salty for your taste. Drain fully and discard the brine. Pat chicken dry.
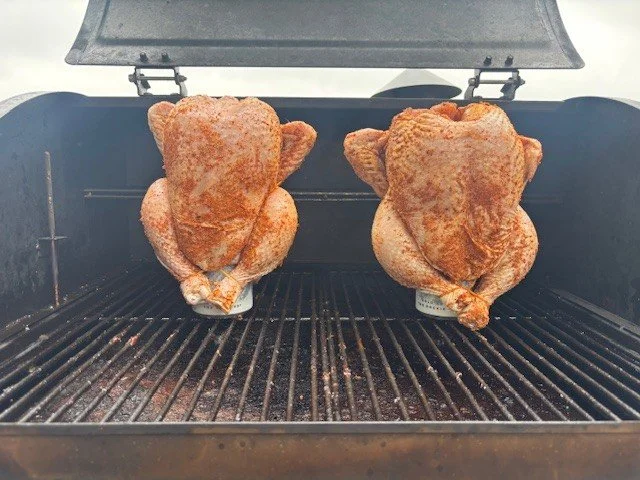
Fill the pellet hopper with hickory pellets (or flavor of your choice). Prepare the meat smoker for medium to high smoke at 225 degrees.
Blend all dry rub ingredients and rub into chicken. Crack open the beer can and drink down or pour away about half. Carefully place chicken atop the can. The can should fit nicely into the cavity of the chicken, standing securely. Place on rack in smoker and smoke for about an hour and a half, checking hopper occasionally to make sure pellet supply is good. Then place the chicken in a 350 degree oven, and allow it to finish cooking until it tests at least 165 degrees,* basting a couple times with melted butter. Allow to rest for at least 30 minutes, but the longer, the better with smoked meats. Pull chicken off of the beer can carefully; depending on how long the chicken has rested, it will still be very hot.
Discard the liquid remaining in the can.
*165 is the internal cook-to temp approved by the USDA, and many people like to pull the chicken then; certainly the chicken will continue to cook for a while and the temp will rise as it rests. For my family, 165 still leaves the chicken too chewy. Kevin especially is unnerved by chewy chicken. We find 180 to be just about right. The chicken will still be pink near the bone; this does not indicate “undone-ness” but rather is just an effect of smoking.

Hello, Dinner!